When I’m wearing my long prose hat, I’m often asked “how long should my scene be?”
Looking at the size itself is largely irrelevant and the answer is always the same; If you’re writing well/efficiently, the scene should be as long as it needs to be.
Contrary to what a lot of writers think there are no “Scene Police”; a scene does not work when it’s reached a certain number of words and not work when it runs short or long of that amount.
- Publishers measure the size of a novel by it’s total word count, not the length of individual scenes.
- Comic publishers publish books based on page counts, not scene counts.
At the end of the day a flexible, superficial measurement, reveals nothing substantial about the content on its own, and content is king.
So on the surface, we don’t need to worry about the size (or number) of our scenes. There is no scene quota that must be filled in each issue.
Of course, while we don’t need to worry, paying attention—looking at things beneath the surface—always helps us write better.
So grab a shovel and let’s start digging.
Before we go any further, let’s define a scene.
From the Working Writer’s Guide to Comics and Graphic Novels
“A scene is a sequence of panels presenting a portion of the story in a specific location and time, usually focusing on a single action, event, theme or character experience. When the time and location change, the scene changes.”
I break scenes into the following lengths:
- Micro: Less than a page (6 panels or less on a page with a ton of panels)
- Short: 1-2 pages
- Standard: 3-5 pages
- Long: 6-10 pages
- Extended: 11+ pages
While scene number and size doesn’t really tell us much about what’s going on in the story, it does give us some face value insight into a comic’s pacing. I talk about this in the Writer’s Guide, but in a nutshell, shorter scenes move faster and longer scenes slow the pace down. Of course content can (and often does) override this tempo, but in many cases short-faster, long-slower holds true.
By setting scenes of different lengths against each other, we can control the pacing of the comic at a rudimentary level, emphasizing the emotional context and speed of the content where and when we see fit.
Because I didn’t go into outlining in the Writer’s Guide, I’ll mention here that it’s useful to look at your scene counts and lengths at two distinct levels.
First, at the Outline Level, then at the Script Level.
I look at the Outline Level scene breakdown more like a “movie shot list.”
If your movie opens with a guy swimming for his life from a giant shark, then ends 50 scenes later with the same guy, at the same place, being eaten by the same shark. You don’t shoot the first scene, then shoot all the other scenes, then put the guy back in the water and finish the shark scene… The beginning and the end are the same scene, at least for purposes of actually shooting the film.
Of course in comics, there is no crew or location to set up. But there is an advantage to assessing the bigger picture when it comes to scenes.
Comic outlines will often produce Long or Extended Scenes (11+ page scenes will only come up in larger graphic novels). Scenes you’ll almost always want to break up into shorter scenes in the actual script. Comic writing rule #7 (from the book), break up really long scenes. Anytime a scene runs over 5 pages, see if it can be shortened or broken up and intercut with other scenes without losing or even increasing dramatic effect.
For example, let’s say you’re working on a single issue and you have the following breakdown.
Scene 1 SHORT (2 pages) Park – MC fighting with his girlfriend
Scene 2 STANDARD (3 pages) Gym – MC working out
Scene 3 SHORT (2 pages) Van – Robbers arming up
Scene 4 MICRO (3 panels) Driving – MC picks up the police call for help over his police scanner
Scene 5 LONG (9 pages) Bank Battle – MC fighting with bank robbers
Scene 6 SHORT (2 page) Girlfriend listening to MC’s voicemail
Scene 7 STANDARD (3.5 page) Police capture MC
In our fictional example, even though the Long Scene is coming in later in the story as an action oriented climax, we should probably break it up because it’s so gosh darn long.
Off the top of my head, I could see intercutting an emotional Scene 6 into the bank battle. Maybe the hero’s voicemail tells his girlfriend how he will never take risks again, so she can count on him and reaffirms his love. Then when the comic cuts back to the bank battle he’s doing something incredibly risky. (Gotta love those character arcs.)
OR
Maybe the last scene can be shortened from a Standard to Short scene and a new additional Short scene can be added during the bank battle. Maybe the hero’s got a sidekick gone bad and he’s doing something important to the story—how bout ratting out the hero to the cops, so he can be captured in the final scene?
Getting an overall view of your scenes can give you other insights and a broader ability to refine the story before you actually start scripting.
Maybe you jump back and forth a lot in the outline of your graphic novel and after breaking down the scenes, you realize you have too few locations and want to add some changes of scenery to break up the monotony…
Or maybe you see some sort of conflict in the content. For example, maybe your quiet, emotional high-point love scene is a Short scene surrounded by a bunch of Micros. Looking at the Outline Level scene list, you realize the impact might get lost and decide you need to slow things down a bit, buffering the love scene with Standard scenes.
After you’ve got the initial Outline Level scene list, you can juggle the scenes around, remove, add, and break it down into the Script Level list.
The script level list notes each scene as it appears sequentially in the book. Though the guy swimming from the shark, then getting eaten is the same scene at the Outline Level, at the Script Level, it becomes two distinct scenes (separated by all the content between), scene #1 and #51 respectively.
The Script Level scene list (along with your outline), gives you a rock solid foundation to begin writing.
As I mentioned in the Writer’s Guide, most of the time scenes will present themselves clearly. But there are some instances where the opening and close of a scene blurs a bit, making it tricky to identify accurately.
Here’s a few of those guys and how I tackle them.
Establishing Shot vs. Establishing Scene
For those who don’t know, an Establishing Shot is typically an exterior long shot showing a location. It “establishes” the time and place of the content that immediately follows. You show a spooky castle with the moon behind it, then go inside where Dracula is having a dinner party. Establishing shots are a crux of good writing.
A single Establishing SHOT typically begins a scene, but is not a scene by itself.
Showing the Ext. Of Dracula’s castle opens scene 1.
Showing the dinner party in progress continues scene 1.
Showing two characters kissing in the garden opens scene 2.
In contrast, something that comes up fairly often is a series of panels used to establish a scene. Long shot of Dracula’s castle. Closer shot of the main entrance. Closer shot of a brass plaque on the door that reads Dracula. These Establishing SCENES become their own unique Micro Scenes.
Showing the Ext. Of Dracula’s castle as a Micro scene opens scene 1.
Showing the dinner party in progress opens scene 2.
Showing two characters kissing in the garden opens scene 3.
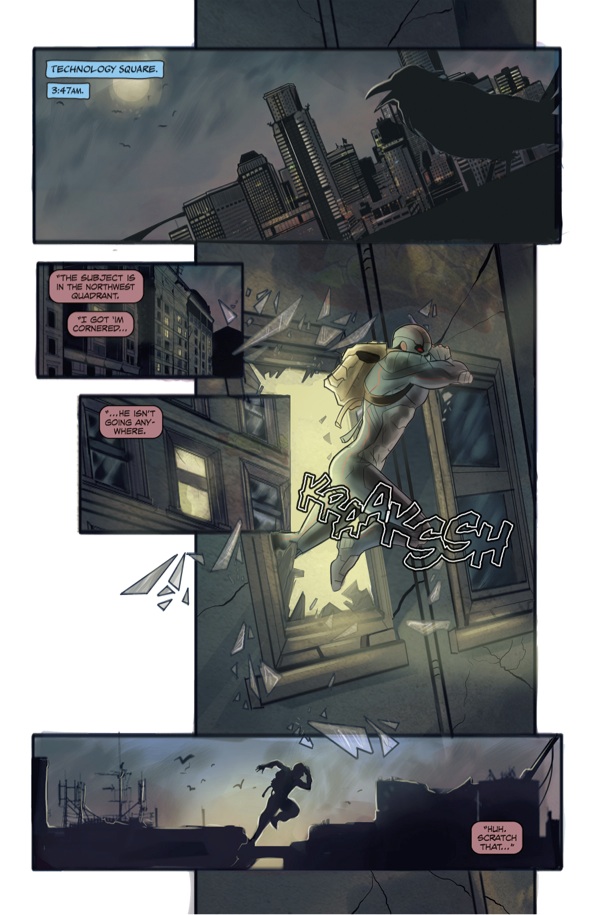
As it turns out I was just reading Bob Salley’s Shelter Division this morning and he opens the story with a 3 panel Micro Establishing Scene. (Actually he embellishes his Establishing Scene with a fourth panel of the villain exploding out of the established building window. In most cases, the content following your Establishing Scenes will remain where you establish it, at least until scene 2.)
Traveling Scenes
Characters do a lot of traveling in comics. Because the methods at their disposal are near limitless: astral projecting, flying cars, flying on their own, etc., locations and times tend to change abruptly and often.
I handle these scenes by opening the scene when the traveling begins and closing it when the traveling stops. (it’s a little more complex than it sounds.)
The scene remains one scene regardless of how many times the location or time changes. As long as the character doesn’t stop (or pause) long enough to do anything particularly relevant, it’s one “traveling” scene.
Traveling scenes are a hallmark of older comics, often used as exposition dumps. While I generally personally try to avoid that application, you will run into them.
Flashbacks and Montages
When Flashbacks and Montages arrive as a series of panels covering multiple locations and times, I handle them like Traveling scenes and assign them a single scene regardless of how many environment changes take place. Often these flashback and Montage scenes are micro scene length.
Rocky punching a speed bag in gym opens “montage” scene 7
Rocky running through the streets of Philly
Rocky running up the steps to the Philly Museum of Art
Rocky punching raw beef
Rocky walking with Adrian opens scene 8
When a flashback or montage focuses on a single location and time, it should be handled as its own scene.
It’s not uncommon for a flashback to be an extensive piece of the storytelling. These flashbacks can arrive in the story as long or extended scenes that need intercutting throughout the story. Catching and addressing these scenes at the Outline Level will give you far more flexibility when you move into scripting.
Keep in mind,
if you’re using Panel Sluglines in your scripts (which I highly recommend, see the Template Page), you still need to accurately call the environment changes for each panel whether it’s a Traveling, Flashback or Montage scene—even if you note the type of scene in the script itself.
For Example, if I was writing a Silver Surfer Micro Traveling scene the sluglines might look like this;
PAGE 7 —————————— scene 5 Traveling (3 panels)
Panel 1
EXT. WOODS – DAY – LOW
Surfer zips under a tree canopy… yada, yada, yada.
Panel 2
EXT. MOUNTAIN – DAY – HIGH
Surfer shoots over a snow capped mountain peak… yada, yada, yada.
Panel 3
INT. TUNNEL – NIGHT – FULL
Surfer flies through NYC’s Lincoln Tunnel, during evening rush hour… yada, yada, yada.
Our scene designations aren’t intended to override any script information to the artist. They’re simply a way for us to stay organized and get a better grasp on how the story is coming together. Notice, with a more traditional approach each one of these panels would in itself be a separate scene (change of location and time)… and that’s the usefulness of combining these “sequences” under the umbrella of one scene. I find without this approach, I quickly start to lose my mind…
While scene count and size aren’t relevant enough to make or break a comic, keeping tabs on them will make your life easier and only help to pull your writing together. ▪
About the Author —
Nick Macari is a full-time freelance story consultant, developmental editor and writer, working primarily in the independent gaming and comic markets. His first published comic appeared on shelves via Diamond in the late 90’s. Today you can find his comic work on comixology, amazon and in select stores around the U.S. Visit NickMacari.com for social media contacts and news on his latest releases.
Interesting stuff man. Im still trying to work out the use of an outline since I have always been one of those guys that just writes and plays with it until it fits. Now im attempting to do this outline and its pretty hard for me because I can see the sequences in my head so clearly that I want to put those details down, much like the establishing scenes.
Thanks for the comment Ben.
FIRST, did you read the other article Outline Development, that discusses the issue you’re dealing with a bit.
SECOND, don’t discard ideas and scenes you see in your head when you’re working on an outline. Record everything, just jot that stuff down in a separate file or paper or index card so you can reference it at your leisure.
For the novel I’m working on now, I have a separate page in my scrivener file called “Dialogue” and it’s just random bits of dialogue that are coming to me, from every chapter of the book. It’s unlikely much of it will go into the final manuscript word for word, but all of it’s gonna be valuable to me as I write. And who knows, one of the lines may wind up being the best line of the book.
LASTLY, check out “Storycraft for Comics” (in the navigation) if you haven’t already. It deals strictly with story discovery and outlining and may help you out.
And LASTLY, LASTLY, remember outlining and story structure takes more time than writing script. So if it feels like it’s taking for ever and you’re really itching to write, you’re probably right where you want to be.
Write on, write often!
Yeah im getting it down for the most part just feels odd, like a fresh water fish dumped into the middle of the ocean. Water feels the same and I can swim but damn its hard to breathe.
I used a brainstorm file to just throw ideas at the wall to see what sticks and it has everything, nearly an untidy bible of sorts that i go back and forth to while putting down this loose outline.
Yes it seems that outlining takes a lot longer but i can definitely see the benefits of working things out first this way. In my first comic i just scripted everything right there and ran into problems I had to fix later on. This time since im not drawing it I have to have the script right to hand to the artist.
Yes ive got that itch but forcing myself to take my time and plan this thing out as well as i can before I dive in. Im very interested to see the final product using this method vs my old method.